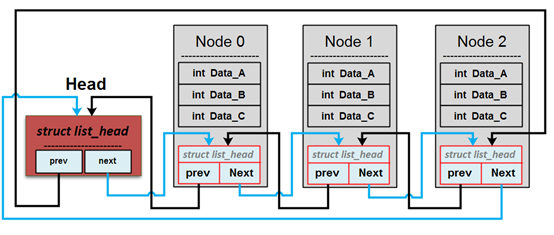
Linux kernel對雙向鏈結串列進行了很好的封裝,它是由一個struct list_head結構與相關操作函數所組成,定義在linux/list.h中。在許多驅動程式中都會看到它的身影,使用起來很方便。只要在自定義的結構中加入struct list_head結構體就可以使用Linux一系列的link-list函數而不用自行撰寫。雖然struct list_head是用在kernel與驅動程式中,但理論上一般應用程式也可以使用,所以即使平常不接觸驅動程式也值得好好研究一番。
使用情境如下:
struct list_head {
 struct list_head *next, *prev;
};
list_head只包含2個指標, 分別用來指向前一個(prev)以及後一個(next)的節點位址
struct My_DATA {
        int Data_A;
        int Data_B;
        int Data_C;
        struct list_head list;
};
list_head運作模式

接著,介紹一下list_head相關的操作函數:
LIST_HEAD(Name):
這個巨集會宣告一個struct list_head的結構變數並作初始化,也就是
將perv與next指標指向自己。
#define LIST_HEAD_INIT(name) { &(name), &(name) }
#define LIST_HEAD(name) \
struct list_head name = LIST_HEAD_INIT(name)
也可以使用INIT_LIST_HEAD這個函式來初始化頭節點,但是這樣的作法要先宣告一struct list_head變數然後再餵給INIT_LIST_HEAD做初始化
void INIT_LIST_HEAD(struct list_head *head)
{
        list->next = list;
        list->prev = list;
}
list_empty
檢查這個串列是否為空。
int list_empty(const struct list_head *head)
{
        return head->next == head;
}
__list_add
__list_add這個函式會將一個新的節點加入一對已知的前(prev)/後(next)端節點之間,也就是說原本相連的2個端點中間會插入一個新節點。
static  void __list_add(struct list_head *new_lst,
                              struct list_head *prev,
                              struct list_head *next)
{
        next->prev = new_lst;
        new_lst->next = next;
        new_lst->prev = prev;
        prev->next = new_lst;
}
list_add
將__list_add重新包裝,讓一個新的節點加入串列的開頭,新節點會變成HEAD指向的next,新加入的節點等於是向前端插入。
PS: 在LDD這書中把這樣的操作比喻為Stack(LIFO)。
void list_add(struct list_head *new_lst,
              struct list_head *head)
{
 __list_add(new_lst, head, head->next);
}
list_add_tail
將__list_add重新包裝,讓一個新的節點加入串列末端中,新節點會變成HEAD指向的prev,新加入的節點等於是向尾端插入。
PS: 在LDD這書中把這樣的操作比喻為Queue(FIFO),事實上它還真的能拿來實作Queue。
void list_add_tail(struct list_head *new_lst, struct list_head *head)
{
        __list_add(new_lst, head->prev, head);
}
__list_del & list_del
__list_del這個函式會刪除某一個節點entry,這需要先知道entry的前(prev)/後(next)端節點。entry原本的前端節點的next指標會指向entry原本的後端節點,而後端節點的prev指標會指向entry的前端節點,這樣一來就沒有其它節點的指標會指向entry,達到刪除的效果。
static  void __list_del(struct list_head * prev,
                              struct list_head * next  )
{
        next->prev = prev;
        prev->next = next;
}
而list_del除了呼叫__list_del之外,還會將entry的prev/next指標指向LIST_POISON1與LIST_POISON2這兩個特別位址。
void list_del(struct list_head * entry)
{
        __list_del(entry->prev,entry->next);
        entry->next = LIST_POISON1;
        entry->prev = LIST_POISON2;
}
查了一下網路上的資料,LIST_POISON1與LIST_POISON2被定義在linux/poison.h中,從注解上來看,當訪問到這兩個特別位址時會發生page fault。LIST_POISON1與LIST_POISON2用來標記那些沒有被初始化以及沒有在鍊表中的list項,讓它們不可被訪問。
/*
 * These are non-NULL pointers that will result in page faults
 * under normal circumstances, used to verify that nobody uses
 * non-initialized list entries.
 */
#define LIST_POISON1  ((void *) 0x00100100 + POISON_POINTER_DELTA)
#define LIST_POISON2  ((void *) 0x00200200 + POISON_POINTER_DELTA)
list_for_each(pos, head)
list_for_each是一個巨集,原型如下:
#define list_for_each(pos, head) \
        for (pos = (head)->next; pos != (head); pos = pos->next)
由定義可以知道是在走訪整個鏈結串列,pos為一個指標並指向第一個項目(head->next),以此為起點一路訪問下去,終止條件是當pos指向head時,代表已經走訪完一圈了。
list_entry(ptr,type,member)
list_entry是一個巨集,是container_of這個巨集組成的,而container_of又會用到offsetof這另一個巨集。 原型如下:
#define offsetof(TYPE, MEMBER) ((unsigned int) &((TYPE *)0)->MEMBER)

#define container_of(ptr, type, member) ({                      \
        const typeof( ((type *)0)->member ) *__mptr = (ptr);    \
               (type *)( (char *)__mptr - offsetof(type,member) );})

#define list_entry(ptr,type,member)     \
    container_of(ptr, type, member)
offsetof用來得知strucct中某一member的位址相對於該strucct起始位址的距離,而container_of是只要得知某一member的位址,就可以利用它進一步推算出strucct的起始位址。(offsetof和container_of進一步的描述之前已寫在這一篇-->Linux的container_of與offsetof巨集 )。所以,list_for_each和ist_entry這兩個巨集搭配使用就可以存取整個鏈結串列。
list.h的相關函數還有很多,上面只介紹到幾個常用到的。接下來來做個範例,以下為完整的Sample code。
由於linux/list.h不能直接由一般應用程式include,所以可以直接將list.h中的struct list head結構與要用到的操作函式直接複製到code中。
#include<stdio.h>
#include<stdlib.h>
#include<string.h>

/**************** add list.h函式 ****************
* 加入上面描述的linux/list.h的操作函式。
************************************************/

struct My_DATA {
    int Data_1;
    int Data_2;
    int Data_3;
    struct list_head list;

};
訪問整個串列並印出串列項的address和data內容。void print_List(struct list_head *head){
struct list_head *listptr;
struct My_DATA *entry;
printf("\n*********************************************************************************\n");
printf("(HEAD addr = %p, next = %p, prev = %p)\n",head, head->next, head->prev);
list_for_each(listptr, head) {
entry = list_entry(listptr, struct My_DATA, list);
printf("entry->Data_1= %d | list addr = %p | next = %p | prev = %p\n",
entry->Data_1,
&entry->list,
entry->list.next,
entry->list.prev );
}
printf("*********************************************************************************\n");
}
加入一個新的串列項,可以向串列前端或尾端加入。struct My_DATA *add_Node_tail(struct list_head *head){
struct My_DATA *entry;
entry=(struct My_DATA*)malloc(sizeof(struct My_DATA));
list_add_tail( &entry->list,head);
return entry;
}
struct My_DATA *add_Node(struct list_head *head){
struct My_DATA *entry;
entry=(struct My_DATA*)malloc(sizeof(struct My_DATA));
list_add( &entry->list,head);
return entry;
}
刪除單一個串列項以及銷毀整個串列:
值得注意的是,刪除串列項的時候會使用到list_del函式,在這裡暫時將entry->next = LIST_POISON1和entry->prev = LIST_POISON2這2行註解掉,因為我們不是在寫驅動程式而是在user space使用,可以把entry->{prev/next}設為NULL,代表該指標沒有指向任何東西,或者也可以把它重新初始化,使用INIT_LIST_HEAD(entry)。
void remove_Node(struct My_DATA *entry){
    printf("\nremove: Data_1=%d (list %p, next %p, prev %p)\n",
            entry->Data_1,
            &entry->list,
            entry->list.next,
            entry->list.prev);

    list_del(&entry->list);
    free(entry);
}

void free_List(struct list_head *head)
{
    struct list_head *listptr;
    struct My_DATA *entry;

    list_for_each(listptr, head) {
        entry = list_entry(listptr, struct My_DATA, list);
        printf("\nFree: entry->Data_1 = %d | list addr = %p | next = %p | prev = %p\n",
                        entry->Data_1,
                        &entry->list,
                        entry->list.next,
                        entry->list.prev);

        free(entry);
        entry=NULL;
    }
}
主程式如下: int main(int argc,char **argv){
LIST_HEAD(HEAD);
struct My_DATA *itemPtr_1 = add_Node(&HEAD);
itemPtr_1->Data_1 = 100 ;
struct My_DATA *itemPtr_2 = add_Node(&HEAD);
itemPtr_2->Data_1 = 200 ;
struct My_DATA *itemPtr_3 = add_Node(&HEAD);
itemPtr_3->Data_1 = 300 ;
struct My_DATA *itemPtr_4 = add_Node(&HEAD);
itemPtr_4->Data_1 = 400 ;
print_List(&HEAD);
remove_Node(itemPtr_3);
print_List(&HEAD);
free_List(&HEAD);
}
執行結果:
從結果可以看出串列項是向前端加入,在印出串列時從head->next開始印出,當然銷毀串列時也是一樣從head->next開始,這樣的運作模式就如同LDD書中所講的LIFO(後進先出)模式。
參考: https://lwn.net/Kernel/LDD3/
http://nano-chicken.blogspot.tw/2009/09/linuxlink-list.html
Linux Device Driver Programming :平田豐
沒有留言:
張貼留言